Hanukkah is almost here! Which means it’s time to get your crafts going so you can bring some cheer and homemade warmth with these decoration ideas. Whether you have them already placed and hung for your celebration or do the crafts with friends and family at the party these decorations are perfect for all eight nights of Hanukkah.

Glass Bottle Menorah
Supplies:
- 8 glass bottles all the same size
- 1 larger bottle
- spray paint
- 9 tapered candles
Instructions:
- Gather your bottles. This may take some time and a lot of drinking.
- Remove any labels on the bottles by soaking them in hot soapy water.
- Spray paint the bottles whatever color you like. If they need more than one coat, let the first coat dry completely before applying the second.
- Let paint dry and wedge candles into the top of the bottles.
- Arrange the bottle so that the bigger bottle is in the center of a line of the smaller bottles.
- Light one every night.
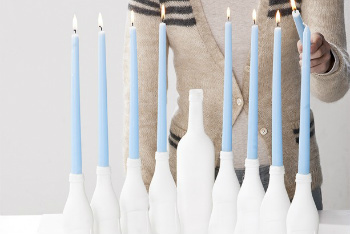 White and Blue Bottle MenorahCourtesy of spoonful.com
Star of David
Supplies:
- Blue pipe cleaners
- Yellow String
- Thumb tacks or tape
Instructions:
- Make two triangles with the pipe cleaners. Twist one closed and leave the other open.
- Insert the open triangle into the close one so that it weaves in and twist the second triangle closed.
- Tie the yellow string to the top of the star.
- At different lengths hang multiple stars in front of a window, from the ceiling or a chandelier and enjoy!
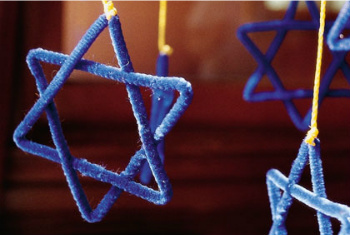 Stars of Davids for Eight Winter Nights Courtesy of readymade.com
Paper Dreidels
Supplies:
- Construction Paper
- Glue
- Toothpicks
Instructions:
- Cut ¼” strips of paper. A paper cutter works best, but scissors will do too.
- Glue the paper to the toothpick. Make sure to glue it just where the taper of the toothpick ends so it’s attached to an even surface.
- Let the glue dry completely. Waiting is the hardest part.
- Tightly wrap the paper around the toothpick.
- Glue the end of the paper to itself to create a disc of paper and let dry completely.
- Using your thumb and forefinger pull the outer edge of the paper disc up so that there is a little bowl of paper. Do this slowly so it doesn’t unravel.
- Good luck playing Draidel!
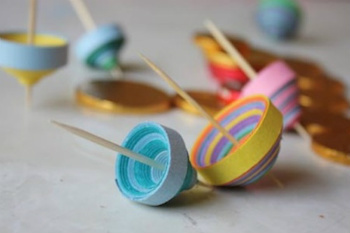 Paper Dreidels are Fun to Make and Play WithCourtesy of celebrations.com


